Tree Stump Removal – How to Remove a Tree Stump

A stump can be a significant eyesore in your yard. Various removal methods exist, from grinding to chemical treatment to manual digging.

If you prefer a hands-on approach, consider using the manual method for removal. First, dig around the stump and expose its roots. Then, use a mattock or pickaxe to chop through the roots. Contact Tree Stump Removal San Diego now!

Chemical Method

Tree stumps are unsightly and obstructive, and they can attract pests, encourage the growth of invasive weeds, and cause damage to other trees and shrubs sharing the same yard space. Not only that, but they can also rot and cause soil instability. Ultimately, they can be detrimental to your home’s value and pose a safety risk for your children and pets. That’s why removing any remaining tree stump is important as soon as possible. There are several different ways to do this, and some are more labor-intensive than others. However, there is a less strenuous method that can be done by using chemical products.

While there are a few different kinds of chemical stump removers on the market, most work by speeding up wood decay. They can be applied to holes drilled into the stump, or mixed with water and applied directly onto the surface of the stump. This process can take some time, as the chemicals need to penetrate the stump and get to work rotting away the remains. However, there are ways to speed up this process, such as by drilling large vertical holes and filling them with potassium nitrate or rock salt. This will give the fungi more to work with, and can help it break down the stump faster.

It is important to note that using chemicals in this way can be very dangerous, so it’s best to only do this if you are familiar with the proper safety procedures. Always follow the instructions on the product’s label, and make sure you use safety glasses or goggles to protect your eyes from wood particles. Also, be sure to wear sturdy work gloves and steel-toed boots.

This is a good option for those who want to avoid backbreaking labour, but still need to remove a tree stump. While it may not be as quick as digging out the stump and roots by hand, it is a much safer option for those who are hesitant to use power equipment. It is also ideal for those who need to remove a large stump quickly, as it can be used in conjunction with other methods, such as burning or manual removal.

Manual Method

When a stump needs to be removed without using a power tool, the manual method can be effective. It involves digging a trench around the stump’s base, exposing its roots and cutting them off with a mattock (a combination tool with a pickaxe on one end and a hoe on the other). Loosening dirt with a shovel or a mattock can be strenuous work, but a hose can help wash away loose dirt and expose more of the root system. After severing the main roots, you can pull the stump out by hand or with a vehicle attached to the end of the mattock chain.

The process of removing a tree stump with this technique is lengthy and time-consuming, but it can be effective when the conditions are right. The natural decomposition of a tree stump over time can be accelerated with the addition of high-nitrogen fertilizer, which will boost the activity of the microorganisms responsible for breaking down the wood and enriching soil.

After a few weeks, the stump will be ready to be pulled out with a vehicle, assuming it is still in good condition. A vehicle equipped with a strong tow chain is ideal for this job, and you will also need a winch or other pulling mechanism to bring the stump free from the ground. A vehicle like this isn’t always a good choice for large stumps, so it may be necessary to hire professional stump removal services instead.

When the stump has been cut, a heavy-duty tarp should be placed over it to keep rain from diluting the chemical solution and slowing down the process. A few more weeks of treatment will result in a soft, spongy stump that can be easily pulled out with the vehicle or another tool. If you’re unable to remove the stump, it’s important to refill in the hole left behind and cover the area with mulch to prevent further decay and encourage future plant growth. This will keep the stump from competing for water and nutrients with new plants, reducing the risk of disease and pests.

Burning Method

Burning is a cheap method of stump removal, but it’s not the safest or fastest. It can take up to a day to remove a large stump through burning, and you’ll have to be on site the entire time. It’s a good idea to bring a hose and fire extinguisher to control any unexpected flare-ups, and you should prepare by scheduling a hefty block of time in which to carry out the process.

If you choose to use this method, you must ensure that it’s legal in your area, as open burning is not usually allowed in urban areas. If you don’t, you may be liable for fines and environmental damage. To start, dig around the stump and expose as much of it as possible. This will make it easier to get rid of. If it’s particularly fresh, you can try to speed up the rotting process by drilling holes into the stump and filling them with nitrogen-rich fertilizer. This stimulates microbial activity and will eat away at the stump.

Once the stump is exposed, you can start to build up the fire. Put kindling on and around the stump and carefully add wood as needed to sustain it. Be careful not to leave the fire unattended, and monitor it at all times from a distance.

You can also use a powdered fertilizer known as salt peta, which is poured into the holes drilled into the stump. This dissolves the charcoal and makes it more brittle, making it easier to chip away.

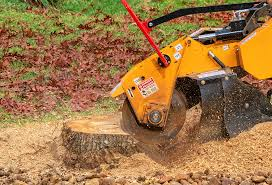
If you don’t want to wait for the stump to rot, you can also hire professional stump grinding services. They can grind the stump and cut it into smaller pieces that you can remove from your property. You should still be aware of any underground utility lines and other important issues, such as the risk of environmental damage or damage to nearby plants. Before hiring professionals, check with your local utility company to locate any lines that may be in the ground or near the stump. Then, clear the area of any fences, sprinkler systems and garden ornaments that could obstruct or be damaged during the process.

Chainsaw Method

Using a chainsaw to remove a stump is an excellent option for those who want to avoid chemicals, but the process can be challenging and dangerous. Unless you have a lot of experience with a chainsaw, it’s best to hire a professional to do the job for you. Before you start, make sure that the area around the stump is clear and free of debris. You should also wear protective gear, including a face mask, safety goggles, and steel-toed boots.

The first step is to use the chainsaw to cut as much of the stump above ground level as possible. Once this is done, move back and take a close look at the stump to make sure that you’ve got all of the roots. Depending on the size of the stump, you may need to dig up large sections of the root system in order to fully remove it from the ground.

After the root system has been removed, it’s time to use the chainsaw to cut the remainder of the stump down. This is a long and tedious task, so be prepared to work for a few hours. To help speed up the cutting process, you can use a chainsaw attachment called a sawzall. This tool has a blade that is less likely to be damaged by dirt than a regular chainsaw.

Once the stump is cut down, you can begin to remove it by hand. This is a very tedious process and requires a great deal of digging and cutting. Depending on the size of the stump, it may take several weeks or even months before it’s completely removed from the ground.

One method that can speed up the removal of a tree stump is to use a chemical solution. There are multiple types of chemical solutions on the market that can be poured down holes drilled in the stump. These chemicals speed up the natural decay process and break down the remaining stump fibers and roots more quickly. If you choose to use this method, it’s important to choose a day with no wind or rain in order to reduce the risk of the solution blowing away or spreading to other parts of your yard.

Driveway Repair Tips

If your driveway has cracks and other surface damage, resurfacing may be a good choice. Depressions and tire ruts also reveal asphalt that needs repair. They allow water to soak in and cause further damage.

Driveway Repair

The biggest consideration is whether your driveway has widespread damage that requires a replacement. Contact Driveway Repair Charleston SC for professional help.

Cracks in your driveway are a common problem and although they don’t usually cause damage it’s still unsightly. Cracks can also indicate structural problems that require a professional assessment and more extensive repair work. In many cases, the best solution for repairing cracks is to use concrete repair products that are specifically designed to bond and seal concrete surfaces, helping to restore the integrity of your driveway and prevent further damage.

For hairline cracks, which are less than 12 inch wide, you can use a concrete patching compound to fill the cracks and smooth out the surface. For this, you’ll need to prepare the area by lightly dampening the concrete and using a putty knife or trowel to work the crack filler into the cracked areas. The best results are achieved when you apply the crack filler in layers rather than filling the entire crack at once. Once the crack filler has set, you can seal it with a high quality concrete or asphalt sealant.

A good concrete sealant has the ability to expand and contract slightly with temperature changes, which helps to prevent pulling away from the edges of the cracks. It’s important to read the label of any concrete repair product you choose, and be sure that it’s suitable for your specific needs.

For cracks wider than 12 inch, you’ll need to use a more extensive repair method. You may need to use a hammer and chisel to widen the cracks so that the concrete repair compound can be properly applied. Then, you’ll need to prep the cracks again by removing any loose bits of debris with a broom and thoroughly brushing the cracks. It’s essential to ensure that the cracks are completely clean prior to applying a repair product, to avoid having the new sealant pull away from the existing cracks.

Structural cracks that appear in the center of your driveway are a serious issue and need to be addressed as soon as possible. These cracks are caused by shifting of the ground underneath your driveway and can lead to severe damage if not treated immediately. If you have large, structural cracks in your driveway, contact a concrete service to assess the problem and provide an appropriate solution.

Potholes

Potholes are a major headache for driveway owners. They damage cars and are a safety hazard for pedestrians. They also make the surface of a driveway look unkempt and unprofessional. In addition, they’re costly. It’s important to address them early before they grow and cause more damage.

Like cracks, potholes are caused by water build-up in a small area of the asphalt. This can happen during the winter after snow melts or rain. Asphalt pavement is especially susceptible to this deterioration, but even dirt or gravel driveways can experience the same issue.

Almost all potholes develop because of poor drainage. This is a problem in both dirt and asphalt driveways, but it is much more of an issue in gravel driveways because there is less of a solid base to support the pavement. This is why a gravel driveway should be regularly graded to redistribute the existing material and keep water from pooling in one spot.

To repair a pothole, start by cleaning out the old material and removing any debris. Heating the hole is important because it removes any excess moisture and softens the existing material. This will allow the new material to bond with the existing asphalt. Once the pothole is cleaned, add the new asphalt patch and tamp it down. If you don’t have a tamper, a lawn roller or car will work fine. After tamping, rake the patched area to blend it with the rest of the driveway surface.

For best results, it’s a good idea to use bagged asphalt patch for driveway pothole repairs. This will usually have instructions on the label that will let you know how to prepare and apply it correctly. Most of the time, you will need to heat the patch before applying it to the pothole. This will help to ensure that it bonds with the existing asphalt and doesn’t fall off later.

If you have a gravel driveway, it’s a good idea to repair any potholes in the spring before the winter weather hits. This will prevent them from getting bigger and damaging your vehicle and the surrounding driveway. It’s also a good idea to perform regular maintenance on your driveway to reduce the risk of potholes and cracks. Regular grading, along with proper drainage and a crown, will minimize water erosion and maintain the integrity of your asphalt pavement.

Crack Filler

Crack filling is a quick, cost-effective way to treat asphalt surface damage. It stops the flow of water through cracks, preventing further deterioration and the formation of potholes. The process involves cleaning the crack, applying a premium crack filler, and smoothing it to blend in with the existing driveway surface. The process can be performed by the homeowner with a caulking gun and store-bought sealants for small cracks or by professionals with industrial-grade materials and equipment.

Asphalt crack fillers are available in a wide range of textures and strengths, making them suitable for various types of asphalt surfaces and weather conditions. Hot-pour crack fillers, which are heated and poured into cracked areas, are ideal for high-traffic pavements. These materials are durable, flexible and able to withstand the movement of heavy vehicles.

Cold-applied crack fillers, on the other hand, are typically applied to parking lots and residential driveways. These materials are less durable than their asphalt counterparts, but they offer a more economical and quicker repair solution.

When cracks in asphalt are left untreated, they can cause serious problems, such as erosion and failure of the base materials. Using crack filler prevents the entrance of rain and moisture into the cracked area, slowing down the rate of deterioration and helping to maintain the longevity of the asphalt.

In addition to preserving the asphalt, crack filling also improves the overall appearance of the driveway. It makes the surface of the driveway look newer and more attractive, which can make a positive impression on customers and visitors.

The process of filling and sealing cracks in a driveway is fairly simple, but there are a few key steps that must be taken to ensure success. First, the crack must be cleaned thoroughly to remove dirt and debris. This step is important because it ensures that the crack filler adheres properly to the damaged area. Next, the crack filler must be carefully introduced into the cracked area, using a caulking gun or crack-filling machine for large areas and a putty knife for smaller areas. Finally, the filled crack must be smoothed and allowed to cure for a minimum of 24 hours before driving over the area.

Sealer

Sealing a driveway is one of the best ways to protect it from damage and prolong its lifespan. It acts as a barrier against water, which seeps into and destroys asphalt from underneath. This is especially important in areas that experience frequent freeze and thaw cycles, as well as shifts and settling of the ground.

Unlike crack filling, which is most cost-effective when applied to small cracks that have not spread widely, seal coating is the most effective treatment for protecting the entire surface of an asphalt driveway. It’s also more economical than resurfacing or replacing the entire driveway.

For the best results, always apply a new sealer to a clean driveway. Remove any weeds or debris and pressure wash the surface to remove dirt and grime. Before applying a driveway sealant, read the manufacturer’s instructions for proper application. Spraying or rolling is usually recommended for even coverage, and a thin coat is best for maximum durability.

Concrete driveways require regular maintenance and resealing to prevent damage and extend their life. This includes cleaning the surface with a brush or blower and washing it with a degreaser every few months to prevent oil or gas staining. It’s also a good idea to distribute the weight of parked cars and avoid driving on icy or snowy driveways, and to inspect your concrete for cracks or other damage annually.

Depending on the type of concrete you have, you can choose from several different types of sealers. Acrylics, epoxy, polyurethanes, and silanes are popular choices, all of which offer durability and weather protection. Penetrating sealers are made of silanes, silicones, or other resins that bond with the concrete to form a chemical barrier against contaminants like water and oil.

While it’s tempting to ignore any signs of damage to your driveway, ignoring problems will only lead to more costly repairs and possibly compromise the structural integrity of the entire structure. Repairing your driveway promptly not only saves money, it ensures the safety of your family and guests who use the area. If you need a repair done on your driveway, contact a professional to get the job done right.

Choosing the Right Siding for Your Home

Siding not only enhances a home’s curb appeal but also protects it from harsh weather and pests, increases its value and provides energy efficiency. Choosing the right siding is important to ensure it will perform well over time.

Engineered wood siding offers the classic, traditional look of natural wood with added elements that strengthen it, resist moisture and rot and reduce termite damage. It’s available in clapboards, trim and fascia/soffit panels. Visit Our Website to learn more.

Flashing is a barrier made from materials like aluminum, copper, or rubberized asphalt that prevents water infiltration around areas where roofs connect with walls. It channels moisture away from these junctions, preventing leaks and protecting siding from rot, mold, and long-term damage. Unlike roof flashing, which is visible, siding flashing is often hidden beneath the trim. Nonetheless, its proper installation is just as crucial to a building’s integrity and energy efficiency as any other component of the structure.

Leak protection is critical to the health of any building. Despite the prevalence of other moisture barriers, slow leaks through damaged or improperly installed wall flashing can quickly overcome them and permeate building materials, causing mildew and mold, wood rot, and saturating insulation. In addition, the dampness caused by leaks can also lead to changes in indoor humidity that can affect building occupant health and safety.

Insufficient or improperly installed flashing is a major contributor to water problems in walls, especially around windows and doors. While caulking can temporarily patch many leaks, the only true solution is to properly flash and seal these penetrations and joints in walls.

Most siding leaks are caused by inadequate flashing, so it is important to regularly check your home for signs of flashing damage, including sagging trim, loose or bubbling paint, and dark spots in the walls. When these signs occur, it is best to have them looked at by a professional as early detection can help prevent costly repairs in the future.

Furring Strips

Furring strips provide a sturdy surface for siding and other finishing materials to attach to. They also provide air space behind cladding, helping to prevent moisture damage within walls. They are especially important for Haddonfield homes upgrading to a rainscreen system.

Furrows, or grooves, in sheathing can create a surface for moisture to gather. The resulting condensation can cause wood rot, mold, and decay within walls. Furring strips eliminate this issue by creating a drainage plane that moisture can flow through and away from the structure.

Installing them at regular intervals will allow water to escape the walls faster, reducing the risk of moisture damage. It’s recommended that furring strips are installed every 16 inches along the wall. They should be placed vertically as well as horizontally to help create a good drainage plane.

There are several types of furring strips available for use on new construction and home renovation projects. Some are made from woods such as spruce or fir that are lightweight and easy to work with. Others are manufactured from materials such as high-density polyethylene (HDPE), a durable and weather resistant plastic that resists rot, mildew, warping, and insect infestation.

The type of furring strip you choose will depend on your project needs. For example, if you’re replacing vinyl siding, you may need to use HDPE instead of wood to protect the integrity of your sheathing. Other options include a cor-a-vent SV-3, which is an open weave entangled net that functions like a traditional furring strip but is much more effective in protecting vinyl from moisture damage.

Other than preventing moisture damage, furring strips can also make your new vinyl siding easier to install and maintain. For example, if you have large pipes running through your walls, you can use the furring strips to allow for their location without impacting the cladding’s installation.

Fascia

Fascia boards sit directly above a home’s roof overhang and connect to the soffit underneath. They protect the edges of your roof from water damage and prevent rot. They also provide a finished look and add to the overall curb appeal of your home. Like soffits, fascia boards come in a wide variety of materials. Wood is a popular choice, but requires regular maintenance to avoid rotting. Vinyl, aluminum, and fiber cement are more durable options that can withstand harsh weather conditions.

Aside from protecting the edges of your roof, a fascia board’s integrity is vital to preserving your home’s structure and preventing structural damage. It redirects rainwater away from vulnerable areas, keeping it from soaking into eaves and rafters. In doing so, it can prevent rot and moisture issues, as well as make your house more energy efficient.

While a damaged fascia may seem minor at first, it can worsen over time, especially if left unattended. In turn, this can lead to problems like rotting and insect infestations. The good news is, when soffits and fascia are replaced with high-quality materials, it can last for years to come without requiring frequent repairs or replacements.

To keep your soffit and fascia in tip-top shape, it’s important to perform routine maintenance and promptly address any problems you notice. When you’re ready to upgrade your siding, don’t forget to replace your soffit and fascia as well! Our experienced team at TruLog Siding can help you select the best soffit and fascia materials to suit your needs. Contact us today to schedule a free estimate in Barrie, ON. We offer flexible financing options to fit your budget!

Profile

The profile of your home’s exterior can be a major factor in its overall aesthetic. It can also have a significant impact on its durability, maintenance needs and cost-effectiveness. A variety of siding materials and profiles are available to suit nearly any architectural style or aesthetic preference, from a classic vinyl clapboard to a contemporary metal panel option. Many of these products have advanced features that make them durable, low-maintenance and resistant to weather conditions that can lead to moisture infiltration and rot.

Durability is a key factor that influences the longevity of siding. In regions that experience severe weather conditions, high winds and heavy rains, a durable material will ensure that your home’s exterior stays protected from damage. Most modern siding options, such as fiber cement and LP SmartSide products from James Hardie, are durable enough to withstand the elements. However, this doesn’t mean that damage won’t occur. In most cases, damaged siding will appear as chipped paint or small indents.

Other factors that influence the longevity of siding include its ability to resist rot and pests and its resistance to UV exposure. Most modern siding is made from durable materials that are able to withstand these conditions and protect your home from moisture infiltration and rot, as well as pest intrusion.

Aside from durability, the profile of your siding can have a significant impact on its appearance. Some options are designed to accentuate architectural details and create a more refined look, while others provide a rustic charm that can complement the character of your home. For example, board and batten siding offers a unique, rustic look that works well on farmhouse-style homes. Its vertical lines enhance the visual height of your home, making it look taller and more stately.

Soffit

Although soffit isn’t something most homeowners think of when assessing the state of their home’s exterior, it’s a crucial part of any roof overhang. Soffits protect a home from damage by providing adequate attic ventilation, keeping pests out, and keeping moisture out. Moreover, the panels create an attractive transition from the roof to the wall and contribute to cohesive curb appeal.

Soffit panels are typically installed on the underside of a roof’s overhang where they cover the bottom of the rafters. They allow for proper attic ventilation, which reduces the risk of moisture damage to rafters, and promotes comfortable temperatures in the living space below. Additionally, soffits prevent rot and mold by preventing water from seeping into the attic.

When it comes to soffit maintenance, regular upkeep is important to avoid moisture damage and pest intrusion. Moisture infiltration from a damaged soffit can cause wood siding to warp or bow. It can also lead to the formation of mold, which is a sign of underlying moisture damage. Moreover, soffits that are clogged with leaves and debris can hinder attic ventilation.

A soffit can be vented or non-vented depending on your home’s needs and available attic space. Vented soffits are ideal for homes with wider eaves that require ample attic space to be ventilated. In contrast, non-vented soffits are best for narrow eaves and smaller attic spaces. LP SmartSide’s soffit and fascia are available in 16 versatile ExpertFinish colors to complement the look of your home’s siding and other trim options. They can also be easily matched to your shingle color selection to provide a seamless, coordinated appearance. Contact us to learn more about our soffit and fascia installation and maintenance services.

Liquid Waste Removal

Managing liquid waste is a complex process that involves several different steps. It is crucial for businesses to follow best practices and ensure regulatory compliance in order to protect the environment and public health.

The first step of this process is treating the liquid waste to prepare it for disposal. This involves screening and separation to separate organic and inorganic materials. It also includes processes like dewatering and thickening. Contact Liquid Waste Removal Perth now!

The treatment of liquid waste involves a series of processes designed to convert harmful contaminants into harmless byproducts or useful resources. The first step is to screen and separate the liquid waste to remove any large particles or non-organic materials that could interfere with the next steps in the process. A number of techniques are available for this task, including gravity settlers and mechanical separators. Next, the liquid waste undergoes anaerobic or aerobic digestion to break down organic contaminants into biogas and digestate. Biogas is a renewable energy source, and the nutrient-rich digestate can be used as fertilizer.

This step is particularly important because it prevents contaminated liquid waste from spreading into nearby waterways, soil, or groundwater aquifers. If this happens, the contaminants can enter the human body through the respiratory tract or the digestive system, and they can cause serious health problems. Contaminated soil can also lead to contamination of drinking water supplies. This is why it is so important to use containment devices like sediment basins, roll-off bins, or portable tanks during the collection and transport of liquid waste.

Once the waste has been screened and separated, it can be transported to a treatment facility for further processing. This step requires careful planning and execution to ensure that the waste doesn’t spill or leak during transit. It’s also crucial to follow the appropriate regulations for transportation and handling of hazardous liquid waste.

The liquid waste is then analyzed to determine its chemical composition and properties, which will dictate the most appropriate disposal method. During this step, it’s also possible to identify contaminants and other harmful substances. The information gathered at this stage will help companies choose the best disposal methods for their waste, and it’s important to maintain detailed records for future reference.

Despite the numerous benefits of managing liquid waste responsibly, many businesses still struggle with this aspect of their operations. For some, lack of access to proper facilities is a major barrier. In other cases, the cost of treatment is prohibitive. Regardless of the challenges, it’s crucial for companies to manage their liquid waste properly to ensure employee safety and environmental compliance.

Disposal

The disposal of liquid waste is a critical part of any business. Liquid wastes can contain a wide variety of contaminants, from hazardous chemicals to heavy metals and other industrial byproducts. When they aren’t properly disposed of, these contaminants can pollute the environment and cause serious health problems for people and animals. To ensure proper disposal, businesses must follow a number of steps to protect the environment and abide by regulations.

One of the most common methods for disposing of liquid waste is to dump it in an approved landfill site. This method involves putting the waste into barrels or tanks that can be picked up by professional waste management companies. This method doesn’t require the purchase of special equipment or facilities, and it also allows companies to comply with local environmental guidelines.

Other options for liquid waste disposal include incineration and recycling. For example, some nonhazardous liquid waste can be composted to produce organic fertilizer. In order to do this, the waste is first removed from its water content and then treated with microorganisms to turn it into useful compost. This helps reduce the amount of waste sent to landfills and it also provides a beneficial alternative for organic fertilizers.

In addition, some types of liquid waste can be incinerated and then converted into energy. This process is called combustion, and it uses high temperatures to break down the chemical compounds in the waste. This reduces the volume of the waste and destroys any harmful pathogens that may be present. This type of liquid waste disposal is a great option for businesses that want to reduce their carbon footprint and use sustainable resources.

There are many different ways to dispose of liquid waste, and each option depends on the specific needs of your business. However, it is important to always follow all local and federal regulations regarding liquid waste disposal. Failure to do so can result in heavy fines and damage your company’s reputation. In addition, it could lead to the shutdown of your facility if the violations are severe enough. To avoid these issues, you should work with a waste disposal company that has extensive experience handling liquid wastes.

Recycling

As part of responsible waste management, many liquids can be recycled and reused. This reduces the need to extract, refine and process raw materials, lowering energy costs and environmental impacts.

This is often referred to as a circular economy where products are repurposed for new uses without consuming fresh resources. Recycling also reduces the need for landfills, which contaminate soil and water with methane, carbon dioxide, and other harmful substances.

The most common forms of recyclable waste include organic and non-organic materials, industrial liquids, and ewaste. Organic waste includes domestic sewage, blood from slaughterhouses and animal byproducts, while industrial liquid waste can include solvents, chemicals, and oil. Non-organic materials like paper, glass and metals can be repurposed through a variety of processes. Metals can be recycled to create new aluminum cans, while paper goes through a recycling process that turns it into pulp and then into new paper. Glass is recycled into new glass containers, and ewaste can be turned into new computers or other electronic devices.

A number of challenges face the development and implementation of sustainable liquid waste disposal practices. These include community resistance, treatment limitations and limited availability of funding and technology. In addition, rapid industrialization introduces new pollutants that require specialized treatment technologies.

To overcome these challenges, companies can collaborate with a waste management company that offers responsible liquid waste disposal services. This option allows companies to avoid costly fines and ensure compliance with regulations.

A vacuum truck can be used to pump contaminated liquids into a secure tank for processing and storage. The tank is then transported to an authorized liquid waste disposal facility where it undergoes a series of treatments before being released for reuse. In addition to reducing disposal costs, this method helps businesses protect their workers from the potential risks of handling toxic substances and improves safety standards. This can lead to increased productivity and lower employee turnover rates. In addition, it decreases the amount of liquid waste that ends up in landfills and incinerators. This helps prevent the pollution of air, soil and water and provides an alternative to using natural resources that can be depleted in less than a century.

Incineration

Incineration converts waste materials into ash and gases through controlled combustion. Its advantages include reduced volume and less need for space in landfills, energy production in the form of heat, and less environmental pollution compared to other disposal methods. The process is also useful in the cleanup of contaminated sites. Across the United States, both offsite and onsite incineration is used as a cleanup strategy at more than 100 Superfund sites.

Liquid waste incineration can involve burning hazardous or non-hazardous liquid waste, turning it into ash and gas. This is accomplished using specialized incinerators that can control the temperatures and emissions produced. In some cases, chemical neutralization is necessary to ensure that toxic substances are not emitted during the process. Once the liquid waste is converted to ash and gas, the remainder is collected in an ash pit. It may then be sold to entities that use it for various purposes or disposed of at designated landfills.

Incineration of solid wastes, such as municipal waste, hazardous waste and medical waste, is a common practice in many regions around the world. The combustion process releases carbon dioxide, water vapor, nitrogen oxides, ash and soot into the air, which can negatively impact air quality and exacerbate health conditions, such as asthma and bronchitis. However, if proper safety measures are followed, incineration can provide a safe alternative to landfills.

The ash generated by incineration can be utilized for various purposes, such as building and road construction materials. It is also an excellent aggregate for lightweight blocks, pavement concrete and bulk fill. Some environmentally conscious entities are even utilizing the ash to make bricks, tiles and shingles, or turning it into energy in the form of electricity.

Because incineration requires high temperatures, it is a costly method of waste management. In addition, incinerators are often subject to strict environmental regulations due to potentially hazardous emissions. In order to avoid potential issues, companies handling liquid waste must have a comprehensive plan for inspections, reporting and monitoring. These data should be analyzed and documented to establish the effectiveness of the company’s procedures.

Essential Guide to Furnace Repair: Common Issues, Solutions, and Maintenance Tips

Furnace repair is an essential aspect of maintaining a comfortable indoor environment, especially during the colder months when a properly functioning heating system is crucial. Homeowners and property managers often find themselves in need of furnace repairs due to various issues that can arise over time. Understanding the causes, symptoms, and solutions to common furnace problems can help prevent costly breakdowns and ensure that heating systems operate efficiently and safely. Contact Furnace Repair Houston for professional help.

Furnace Repair

One of the most common issues with furnaces is a lack of heat production. This problem can stem from various sources, including a malfunctioning thermostat, a clogged air filter, or issues with the ignition system. A malfunctioning thermostat may fail to properly communicate with the furnace, leading to incorrect temperature readings and preventing the system from turning on or shutting off at the desired settings. Clogged air filters restrict airflow, causing the furnace to overheat and shut down prematurely. The ignition system, whether it is a pilot light or an electronic igniter, plays a crucial role in initiating the heating process, and any failure in this component can prevent the furnace from generating heat.

Unusual noises coming from the furnace are another indication that repair may be necessary. Rattling, banging, or whistling sounds can be a sign of loose components, a failing blower motor, or air pressure imbalances within the system. These noises should never be ignored, as they can indicate underlying issues that, if left unaddressed, may lead to more significant damage. Regular maintenance and inspections can help identify and resolve these problems before they escalate.

Another common furnace problem is inconsistent heating throughout the home. This issue can be caused by blocked vents, ductwork leaks, or an improperly sized furnace. Blocked vents prevent warm air from circulating efficiently, leading to uneven heating. Leaks in the ductwork allow heat to escape before reaching its intended destination, reducing the system’s efficiency. If the furnace is too small for the space it is intended to heat, it may struggle to maintain a consistent temperature, leading to frequent cycling and increased energy consumption.

Short cycling, where the furnace turns on and off frequently, is another indication of a malfunction. This issue can be caused by an overheating system, a faulty thermostat, or airflow restrictions. Overheating often results from dirty filters or blocked vents, which cause the furnace to shut down as a safety precaution. A faulty thermostat may send incorrect signals to the furnace, leading to frequent cycling. Ensuring proper airflow and addressing thermostat issues can help resolve this problem and improve the furnace’s efficiency.

A noticeable increase in energy bills without a corresponding increase in usage is another sign that a furnace may require repair. A furnace that is working harder than necessary to produce heat is likely operating inefficiently due to worn-out components, clogged filters, or leaks in the ductwork. Regular maintenance, including cleaning or replacing filters and inspecting ductwork, can help improve efficiency and reduce energy costs.

Pilot light or ignition problems can also indicate the need for furnace repair. If the pilot light frequently goes out or the electronic ignition fails to start the furnace, it may be due to a faulty thermocouple, a clogged gas valve, or electrical issues. These components are essential for ensuring the safe operation of a furnace, and any malfunction should be addressed promptly by a qualified professional.

Another issue that homeowners may encounter is a furnace that produces a burning smell when turned on. While a slight burning odor when first activating the furnace for the season is normal due to dust accumulation, persistent smells can indicate problems such as overheating components or electrical issues. A musty smell could indicate mold growth within the ductwork, which can pose health risks and should be addressed immediately.

Regular maintenance is key to preventing furnace problems and extending the lifespan of the system. Homeowners should schedule routine inspections to check for worn-out components, clean the system, and ensure all parts are functioning correctly. Changing air filters regularly, inspecting ductwork for leaks, and ensuring vents remain unobstructed can go a long way in maintaining an efficient and reliable heating system.

For those experiencing furnace issues, attempting DIY repairs can sometimes be effective for minor problems such as replacing filters or resetting the thermostat. However, more complex repairs, such as fixing ignition systems, replacing motors, or repairing gas valves, should be left to professionals. Furnace systems involve electrical and gas components that require specialized knowledge and tools to repair safely.

Ignoring furnace problems can lead to more significant issues, including complete system failure, carbon monoxide leaks, and even fire hazards. If a furnace exhibits persistent issues such as failing to start, producing unusual noises, or emitting strange odors, it is essential to seek professional assistance promptly. A well-maintained furnace not only ensures a comfortable indoor environment but also contributes to energy efficiency and safety.

In many cases, the decision to repair or replace a furnace depends on the age and condition of the unit. If a furnace is over a decade old and requires frequent repairs, replacing it with a newer, more energy-efficient model may be a cost-effective long-term solution. Modern furnaces come equipped with advanced features that improve efficiency, reduce energy consumption, and enhance indoor air quality.

Ultimately, furnace repair is a crucial aspect of home maintenance that should not be overlooked. By recognizing early warning signs, performing regular maintenance, and seeking professional assistance when necessary, homeowners can ensure their heating systems remain in optimal condition. Whether addressing minor issues or considering a complete system replacement, taking proactive steps can help maintain a warm and comfortable home while minimizing energy costs and ensuring safety.

Different Types of Pests and Control Methods

Pests are unwanted organisms that damage or devalue crops, landscapes, and human structures. They also displace native plants and alter ecosystems.

Prevention is the primary goal of IPM. However, suppression and eradication are necessary when pest populations build up to unacceptable levels. Contact Pest Control Olathe now!

Insects are a major pest of many crops and home gardens. In addition to direct damage, they can transmit plant diseases. Many insect pests can be controlled through cultural, physical or chemical means. Others can be controlled through biological or other natural means, such as pheromones, herbivory, parasitism, and predatory behavior. Biological pest control methods are often a part of integrated pest management plans.

Predatory insects, like the aphid-eating ladybug species Adalia bipunctata, can be used to provide natural pest control. Ladybugs find aphid populations through their sense of smell and feed on them with their specialized mouthparts. They are especially effective in high-infestation areas where they can quickly consume aphids.

Observing pests and their numbers is the first step in any pest management strategy. Regularly checking a field, garden, or landscape to identify which pests are present, how many there are, and what damage they have caused is called monitoring or scouting. This helps to determine whether a particular pest is a nuisance or if the pest population is large enough that control measures are warranted.

Monitoring also provides important information about the pest’s biology and environmental factors. This helps to select the most appropriate control method(s) and to evaluate how well control methods work over time.

Other pest control techniques include crop rotation, which prevents an insect from becoming a dominant species and thus limiting its ability to cause damage; proper planting depth to reduce the chance of overcrowding; physical controls such as weeding and hand picking; and baits and traps. Various chemical pesticides are available, but they often have side effects. They also can be ineffective, especially if the wrong type of pesticide is used.

Some pests are naturally controlled by weather conditions, such as extreme cold or heat, rain or drought. These conditions affect the growth rate of the plants they feed on and their ability to reproduce.

Rodents

Rodents like mice and rats are common pests in and around homes. They can cause damage by chewing through pipes and wires, and they can spread dangerous diseases through their droppings and urine. They are also carriers of ticks, mites, and fleas that can transmit the same illnesses to humans. In addition, rodents can create a fire risk by chewing through wood and flammable materials in the home.

Mice and rats can enter a home through cracks and crevices as well as through open windows and doors. Sealing these entry points can significantly reduce the number of rodents in the house. Regular maintenance and inspections for signs of rodents, such as droppings, gnaw marks, and nesting material can help prevent an infestation.

The most common rodents that we see in and around structures are house mice and Norway or black rats. These are considered commensal rodents, meaning they coexist with humans and feed on the same food sources. Other rodents, such as squirrels and pocket gophers, are semi-commensal, coexisting with humans but feeding on different types of food.

Keeping a clean environment and removing food sources is the best way to prevent rodents from invading a home. Often, the first sign of a rodent problem is seen by noticing rodent droppings inside cabinets or drawers. The odor of mouse and rat urine is also a strong indicator of their presence.

Rats and mice carry at least 35 diseases that can be transmitted to people and pets, including Lyme Disease, salmonella, leptospirosis, hantavirus, and rat-bite fever. They can also transmit diseases through their saliva and urine, as well as by biting.

To avoid rodents, store foods in sealed jars or tins. Keep firewood elevated a few inches off the ground, and remove weeds and overgrown vegetation from near your home. Rinse food and drink containers before discarding them. Keep crumbs and other debris to a minimum, and vacuum or wipe surfaces frequently.

A professional rodent control service can help evaluate your property for rodent signs and determine the best removal and prevention methods for your needs. Integrated rodent management typically involves sanitation, exclusion, trapping, and lethal control.

Weeds

Weeds are unwanted plants that invade cultivated garden space and compete with crops for water, sunlight and nutrients. They can be a nuisance in a home garden and can block access to vegetable patches, hinder crop production, and even deter the growth of new seedlings. In addition, they can harbor insects that attack crops and impede airflow. Weeds also take up valuable farmland and can impact the environment, economy and natural ecosystem.

The weed problem is especially serious on conventional farms, where farmers spray crops with chemicals to control weeds, insects, diseases and pathogens. Heavy pesticide use has raised concerns about human health and environmental impacts, and resistant weeds have developed to some synthetic herbicides. To reduce the amount of pesticides used, farmers have turned to other methods. In organic and transitioning farms, this consists of tilling soils, rotating crops and scouting fields to ensure that weeds don’t grow to the point where they interfere with harvesting.

Perennial weeds are the most difficult to control since they produce a lot of seeds that sprout over time. To reduce their numbers, cultivate the soil to bring up buried propagules (stems, rhizomes and tubers). A light tilling will break up these weeds, which can be dug out by hand or pulled with a hoe or rototiller.

Using herbicides is another way to destroy weeds, but this method is more hazardous than other forms of pest control. Some types of herbicides are broad spectrum, killing everything in a category (such as grasses, sedges and broadleaf plants) while others are selective, targeting one plant type (like acetic acid, an organic herbicide that kills grasses but not berries). Herbicides can also be systemic, which moves through the weed and disrupts chemical processes in the plant, starving it to death.

When applying herbicides, always follow the directions on the label. Wear a face mask, rubber gloves, and appropriate clothing for the specific type of herbicide you are using. Be sure to wash the chemical off your clothing immediately after application and to dispose of it properly so that it doesn’t pollute water bodies or harm wildlife.

Other

Pest control may involve the use of chemicals such as insecticides, but many pest control companies have begun to incorporate non-chemical methods in their services. These can include physical barriers such as traps and barrier systems, changing cultural practices, or using natural enemies to reduce pest populations. These methods are known as Integrated Pest Management (IPM).

The goal of pest control is to protect crops, health, and property by managing organisms that damage these things. This is achieved through the use of monitoring, inspection and surveillance to identify pests, followed by an action plan to either prevent or manage them. Pest control measures include prevention – keeping pests from occurring; suppression – reducing the number of pests to an acceptable level; and eradication – eliminating an entire pest population.

Ideally, pests are prevented from damaging plants by selecting crops that are well-adapted to the climate and soil; maintaining healthy plant growth through good cultural practices such as fertilization and irrigation; and early detection and intervention through pest monitoring and inspection. This can reduce the need for chemical controls that often harm beneficial insects and other organisms, as well as pollute our waterways.

When pests do occur, they should be controlled as soon as possible to limit damage and economic loss. Pesticides should be used only when other controls are ineffective and with great care to minimize risks to human health, beneficial insects, wildlife, and the environment. Pesticides should be used only when the risk of adverse effects to the environment is lower than the cost of controlling the pest.

Other controls to consider include squashing, washing off or trapping pests; removing harborage sites; denying access to food and shelter; and planting flowering plants and wild herbs that attract beneficial insects. Beneficial insects are predators, parasites and pollinators that can significantly reduce pest populations in horticulture, agriculture, and viticulture, as well as in landscapes and forests. Examples include earthworms, wasps that lay their eggs inside aphids and caterpillars, and bees that feed on nectar or pollen.

In addition to the need for pest control, businesses have a legal responsibility to keep premises free from vermin and other undesirable substances. This includes office buildings, food service locations, hospitality sites and healthcare establishments. This is governed by the Health and Safety at Work etc Act 1974, which requires business owners to take necessary steps to ensure that pests do not pose a threat to employees and members of the public.